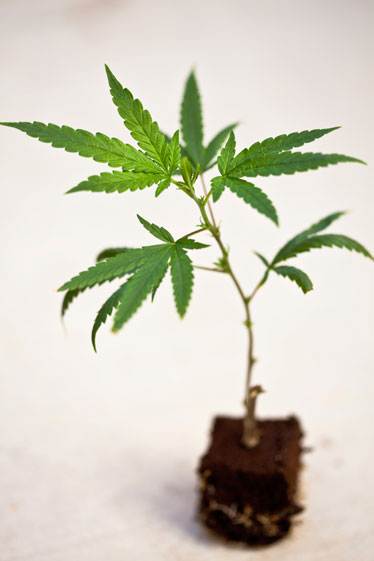
What is a cannabis “clone?”
What are the advantages of taking marijuana clones?
So...at it’s simplest, cloning basically means cutting off a piece of plant and sticking it in the ground! New roots grow out of the stem, and soon you have a new cannabis plant! ...at its simplest!
Cloning cannabis is the process of making a smaller copy a specific cannabis plant. Basically a clone is a little piece of plant that has been cut off (a “cutting”) from a parent plant – these cuttings make roots of their own and grow into an identical plant as the “mother!” Each cannabis clone has the same genes, an exact genetic copy of its parent. That means if the parent of the clone is a female, you are guaranteed that all the clones taken from that cannabis plant will also be female. This is an easy way to get many plants that will grow the same and produce buds with similar characteristics (smell, taste, potency, etc) as the mother plant.
*Clones are not for everyone though– many growers want to grow different strains. For these growers it may be better to start with seeds because it gives you the ability to grow different strains without having to maintain extra plants.
What You Will Need To Start
⦁ Low wattage, 10-20 watts of cool white flourescent per sq ft. (to start, you WILL need a powerful grow light within a couple weeks)
⦁ Cloning machine or Clone dome(w/heating mat)
⦁ Rooting cubes, Gel, Solution & Spray
⦁ Clean razor blade

!!! WORK WITH ONLY ONE CUTTING AT A TIME!!! Very Important, START TO FINISH-1 cuttingt a time!!
Lay out all of your supplies in front of you.
Find a good spot that will be undisturbed and well ventilated(good air flow) or use a small fan to move air over and around the dome, for at least 3wks, while your babies take root(closet, spare room, basement, etc.)
Plug in the heater mat and lay flat, set light stand on mat lengthwise, then set the dome in/on light stand. Make sure the section of the dome with vent holes is on top, otherwise you're gonna have a messy situation and not have enough solution left. Open dome & place seed tray inside.
Rooting machines make it easier to root cuttings. However, rooting cuttings is not difficult. Trim healthy cuttings from your healthiest plant. They should be between 6 and 8 in Long. Trim off most of the leaves making sure to leave the top leaves on.
To keep the medium sterile and increase oxygen in the solution/water, which promotes rooting, make a solution of 1 part drug store hydrogen peroxide, 3%, with five parts water. The Clones should be kept in a space with 65% humidity or higher, the higher the better. The cuttings have no roots at this time, therefore the only way to absorb nutrients and moisture is through the leaves .
A dome or cover is an easy way to maintain a higher humidity. Remove or open covers after 6 to 9 days, and keep the Clones in an area with high humidity, and good airflow.

NEXT:
Trim off any big lower leaves or node points from the new cutting and clip the ends off the top fan leaves if they’re big(about half way down the length of the leaf section). You should only have a couple leaves left near the growing tip and these leaves cannot be too big. Clipping the leaves helps prevent the cutting from “over-exerting” itself trying to turn light into food, when the plant should be focused on roots.
Remove cutting from plant or tube and prep stem. Be sure to completely finish each cutting before starting the next, you do not want air bubbles getting into your cuttings, they will not make it.
Working up from the cut end, Just below the 1st node, use the razor blade to cut a 45 degree angle, then gently scrape (just the very outer layer of the stem) & delicately cut a 1/8 to 1/4 inch, even split(lengthwise) in the newly cut end of the cutting so more “raw” insides get exposed. The roots grow most easily from the parts of the stem that are raw, so scraping and splitting exposes more “insides,” which gives more surface areas for roots to grow out of and promotes faster rooting.
IMMEDIATELY
dip your newly scrapped & split cutting into rooting gel to seal off air bubbles and give your cutting what it needs to start making roots. Very, very gently swirl in gel for about 20-30 seconds, Making sure you coat the entire bottom of the cutting, so that all the parts of the clone that get put into your starter cube are covered in gel. Some growers will use gel and then powder afterwards to get the best of both. We have had tremendous success with just the gel.
Place the new clone into a moistened starter cube, and gingerly press around the bottom to make sure everything is sealed and no air can get to the rooting area. Place cube into seed tray and spray with the cloning mist (do not soak). Close the lid on the dome and repeat the process until all your babies are in. Make sure none of the leaves are overlapping in the dome, trapped water can cause fungus to grow. At this point, pour rooting solution into the dome, close the dome completely, being sure to not block air vents, set light over dome, plug it in and your good to go.
**First days are the most crucial, be sure you are checking for any dead or dying leaves or slumped over cuttings and hull them out at first sign.
⦁ 3 days: Your babies should be standing up straight now, pointing at the light, any cuttings drooped over will most likely not make it. Open dome and lightly spray cuttings with cloning mist, close dome. Visual check.
⦁ 6 days: Open dome and lightly spray cuttings with cloning mist, close dome and. Visual check
⦁ 9 days: Open dome and add flowering formula fertilizer at 1/4 strength, pHed to 5.9. Increase the light intensity to 25-40watts per square foot, if possible. Over the next 10 days increase the strength of the nutrients by adding growth formula, again at 1/4 strength. Slightly prop open dome top to allow more airflow.
⦁ 12 days: Spray again with rooting mist, visually check, maintain high humidity & good air flow.
⦁ You should start to see signs of rooting at this point, some cuttings take 2weeks to root, some take a month. Patience is key. Signs of rooting include vertical and new leaf growth and white root hairs staring to protrude from the cube. Slightly burnt tips of the new and uncut leaves is also another sign of root formation.
Clones like warm, wet conditions. Think springtime. When caring for clones, try to create "Spring time-like" conditions. Your clones need to get their water through their leaves right now, because their roots haven’t formed yet.
That’s why a nice humid cloner works great. Some growers will use a heating pad under their clones to help keep things warm. A little warmer than room temperature 72-77 °F (22-25 °C ) is perfect.
The included heater mat raises the temperature under the root zone about 10 degrees. So if it's already 75 in your designated area, only use the mat for about the first 30 minutes, just to get the humidity going, then unplug it. Otherwise you will cook your new cuttings to death. Too warm.....All dead. Very important.
Leave your grow lights on an 18/6 (Light/Dark) for your new clones. Don’t give new clones 24 hours of light, without any dark periods. This can slow down the rooting process. Rooting seems to happen best when there’s some amount of darkness each day.
The most important thing is to keep a close eye on your new clones until they’ve become well-established. Once you see a considerable amount of roots growing from the cube(considerable being the debated term), it's time to transplant into your preferred method of growing (soil, hydro/soil-less, aeroponic, etc.), these cubes are usable in any medium.
We usually wait until we see at least a dozen strong, healthy roots coming from the cube, sometimes more, sometimes less, it really depends on how the new clone is looking and growing overall, this is where experience over time will play hugely to your success rate.
Cloning gives you the power to take one plant and get unlimited new cannabis plants for practically forever! You can clone clones and then clone those without a problem. For 7 years now, almost all of our plants have come from clones.
Enjoy the power of marijuana cloning!
We Thank You for your interest in Home Grown Vermont Professionals LLC